
As mentioned in the post “About the tracks.bin”, one of the most important files of TS is the tracks.bin.
The aim of this and next tutorials is to give a general background of how RW manages the route files and then in detail we will see how to evaluate this important file and what is stored inside it.
This tutorial does not pretend to be exhaustive and complete, as it is the result of my analysis recently made to try to solve crash problems and errors that occurred on my route and certainly there are more comprehensive tutorials on the web, but it’s a good starting point to understand how to handle and how to verify a route and the tracks.bin.
In this first part of the tutorial, we start by understanding the typical structure of a route and how to manage its files.
The route resides in a folder whose name is a sequence of characters generated by RW in the creation phase (technically called GUID or Globally Unique Identifier) which is a string that for the number of possible combinations of 2 raised to the 128th power, can be considered really reasonably unique.
By definition, the string is made up of a sequence of 8-4-4-4-12 characters, separated by a hyphen.
Inside the folder, the typical structure is represented in the image:
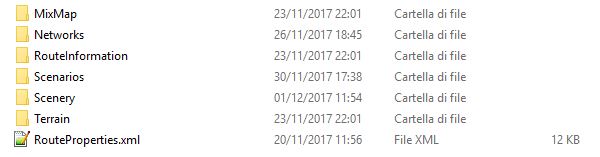
The RouteProperties.xml file is an xml type file containing general route info’s such as name, coordinate location, the template it was based on, applied texture types, seasons, and the list of all providers and product of the used assets and that must be included when loading the route (it is a good idea to avoid leaving providers and products that are not used because they slow down the loading process and take up unnecessary memory). For completeness, the provider is the name given by the creator to a series of contents that can be used by the route creators. In my case, for example, my provider is CAST. Product instead is a subfolder of CAST that helps to subdivide subsets of assets. In my case I have created a generic product ADDON and a TORINO-BARDONECCHIA product, containing specific assets of the route only (i.e. stations). It is obviously a largely personal and subjective structure.
Now let’s move on to the various folders.
MixMap contains for each tile the “painting” of the ground, it means the details of how tile to tile we went to change the standard grass with the materials we needed (mud, rock, etc)
Scenery contains for each tile the scenery objects (houses, benches, lights, etc.) positioned. With scenery objects we mean practically all the objects that are not streets or lofts (after I will explain what is meant by loft) and that are not related to the rail of a train. To be clear, are not scenery objects tracks, signs, mile posts, level crossings, etc. Making a categorization is a bit complicated given the variety of asset types that can be created, but in general with the experience becomes clear.
Terrain contains for each tile the altimetric shape of the terrain, loaded from external altimetric data or modified manually by us via the editor tools.
Scenarios instead includes all the driving scenarios created, and does not require a great deal of detail here.
Before moving to the more complex folder, Networks, below you can see the contents of part of the Scenery folder (the contents of MixMap and Terrain and the others that we will see later does not change from this except for the size of individual files).
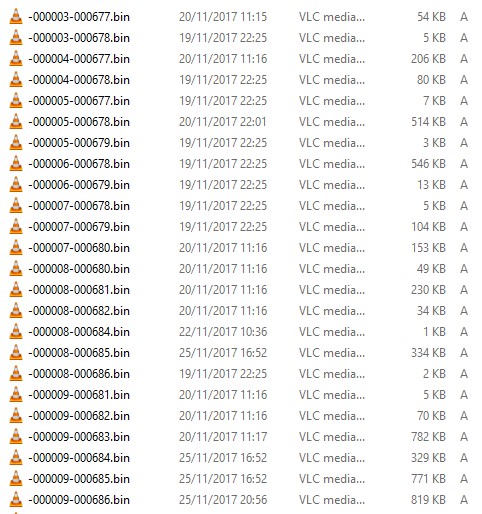
This is to explain what I mean by “for each tile”. RW manages the game world in tiles, 1km x 1km squares (approximate, in fact they are 1024m x 1024m).
Each tile is specified with an X and Y coordinate, starting from the origin of the route being created, which is therefore -000000-000000 (in my case having taken an existing route as starting point, the values are shifted a lot in Y, but it is not important ).
So in all the folders reside a series of files that clearly identify a specific tile (the same number is shown in the editor at the bottom left and varies with the variation of the position in which you are). If there is a certain file and the size is not just 1kB, it means that some scenery object has been placed in that tile (Scenery folder) or there is a non-zero elevation (Terrain folder) or the ground has been painted (MixMap folder) or there is a loft object (Lofts folder) or there is a road (Roads folder) or finally there is a track (Tracks folder).
Tile size of 1kB, after verification, are normally erasable because empty. It can happen if an object was inserted and then deleted. An empty tile normally has this content.

As it is clear by the above image, there is only one header without any content.
This is true for Scenery, but also for Lofts and Roads (which we will now see). Instead, the MixMap and Terrain tiles have always a fixed dimension, because they are depending on the size in meter of the tiles (let’s say the resolution of a tile, we can consider them as a parallelism like an image with 1024×1024 px that has a defined dimension independently if it’s completely white or black, at least if it is not compressed with some algorithm).
Moving to the Networks folder, this folder has at most the following structure:
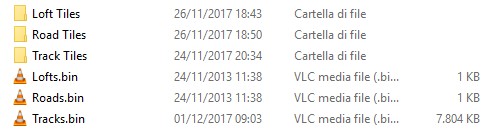
The Tracks.bin file and the Track Tiles folder always exist when the first track is placed.
The Roads.bin file and the Road Tiles folder are created if and only if you put at least one road.
The same for the Lofts.bin file and the Loft Tiles folder.
Note that the Tracks.bin file has a size proportional to the number of tracks and rail objects you decide to lay, while the Roads.bin and Lofts.bin files are dummy files that are always 1kB. Do not delete these file because needed by RW.
All three subfolders have a structure similar to that seen for the Scenery folder, therefore they include Loft / Roads and Tracks laid tiles for tiles.
What is loft? Loft means all those linear objects specially designed to be laid in length (i.e. railings, sidewalks, cables, etc).
Even the streets in the end are Loft objects, in the sense that they are placed and used in the same way, but for game management are inserted into their own folders.
Before closing this fast overview, let’s see how to convert a .bin file, whatever it is, in xml format, and then read and work with a normal text editor, and of course also convert from xml to bin once the file has been modified.
To do this, a RW tools is used; it resides in the root directory of RW and is called serz.exe. To convert, simply drag the .bin file over the serz.exe file and the conversion is done automatically and the xml extension file will reside in the same folder and with the same name as the source file.
Repeat this operation by dragging the xml file to convert it back to bin. The program does not ask for replacement confirmation, so be careful!
With serz.exe you can convert one file at a time and if for a variety of reasons you have to convert a whole folder, you can use the SerzMaster.exe file. When you open the program, the following dialog box appears:
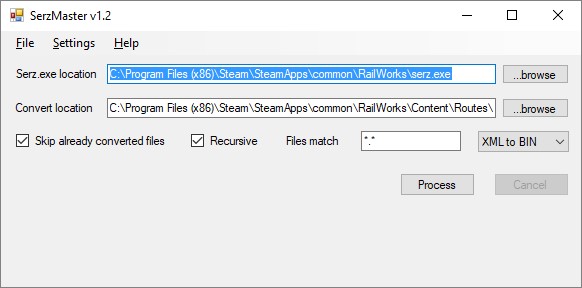
In the first line you must enter the path where the serz.exe utility resides. It is normally already correctly filled.
Convert location is the route folder you want to convert, use the browse button to select it.
The rest can be left as it is, and it is self explanatory, but before pressing the Process key, choose to the right if you want to convert from XML to BIN or vice versa.
As a general rule, on all tiles, with the exception of the tiles under Tracks, you can act on files converted to xml without major risks, provided you of course work carefully and respect the file structure. By this, I mean that if you corrupt a single tile, you can still use the route, providing to delete the corrupted file itself. Clearly you’ll miss tile info’s and you’ve to rebuild it, but at least the route is still safe. On Tile Tracks (and especially on tracks.bin), it’s very risky for the reasons we’ll see in one of the upcoming tutorials.
It’s a good idea to always make a backup copy of all the files that you want to modify, to avoid unpleasant surprises and loss of working days, if not the unrecoverable loss of an entire route. A damaged Tracks.bin file without backup means that you lost all the tracks without recovery possibility.
There are nice tools to make backup. I personally use the Mike Simpson utility. You can download it at the end of this pdf.
With this first introductory tutorial, it’s all. In the next tutorial we will begin to look at the tracks.bin files and related tile files, which is the primary purpose of this tutorial.